
AI-generated 3D models look good on screen, but a solid figurine is rarely what you want for a light decoration. This article is for makers, small shops and IT-minded business owners who want to go from a text prompt to a hollow, translucent lamp shell: how to word the Meshy prompt so the result is printable, and how to hollow the model so it prints without internal supports. Our example is a Christmas snowman lamp.
The starting point: a prompt written for printability
Meshy's text-to-3D works in two steps. A preview task creates an untextured mesh from your prompt; an optional refine task textures a successful preview. The prompt can be up to 800 characters. For a print project, the preview mesh is what matters, because a white lamp needs no texture.
Typical problems with AI-generated models for FDM printing are thin protruding parts, no flat standing surface and fine detail that the nozzle cannot reproduce. So we describe the shape we want, not just the subject. This is the prompt we used for our snowman:
cute chubby Christmas snowman figurine, two stacked round snowballs,
wide round bottom body, top hat, knitted scarf wrapped tightly around neck,
short carrot nose, arms pressed against body, compact smooth shape,
no thin protruding parts, flat bottom
Every phrase has a job:
- "chubby", "wide round bottom body", "compact smooth shape" – thick volumes are easier to hollow evenly.
- "arms pressed against body", "scarf wrapped tightly", "short carrot nose" – fewer slender parts that break off or print poorly.
- "no thin protruding parts", "flat bottom" – a stable standing surface that can later become the lamp opening.
The lesson from this project: a prompt written for printability gives a model that is much easier to prepare for FDM. Text prompts are not deterministic, so expect to generate a few previews and pick the best one.
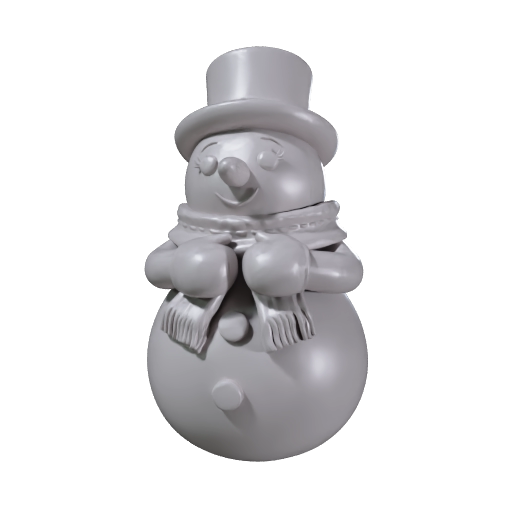
The original Meshy preview model (render), before post-processing.
Note: Meshy credit prices and model names change. At the time of writing, the official API pricing page lists 20 credits for a text-to-3D preview with meshy-7.1 or meshy-6, and 5 credits with meshy-6-lite or the Smart Topology models meshy-t2 and meshy-t2.5; refine costs 10 credits at 2K/4K texture resolution (15 credits at 8K). Check the current pricing page before you plan a batch. The API documentation also marks the old art_style parameter as deprecated (“Leave it out. Meshy ignores it.”), so describe the style you want in the prompt text itself.
Why a raw AI mesh is not a lamp
Our Meshy snowman mesh was frayed: it consisted of 123 separate parts. That is not a good basis for hollowing: a thin translucent wall needs a clean, closed surface. For a lamp we also need to control three things:
- Wall thickness – thin enough to let light through, thick enough to print as a solid wall.
- Inner overhangs – the cavity has a ceiling, and you cannot place supports inside a closed shell.
- A defined opening – it must fit the light source and give the lamp a stable base.
Hollowing the model
Step 1: cut a flat base and scale
The round bottom was cut flat so that the standing area has a diameter of 48.6 mm (a 40 mm opening plus a 4 mm standing ring on each side). Then the model was scaled to 100 mm height, which gives 61 × 62 × 100 mm.
Step 2: rebuild the surface and create the cavity
Because the mesh was frayed, our own Python tool hohl.py, written together with Claude Code, does not try to repair it triangle by triangle. It voxelises the model, computes the inner cavity with a distance transform and rebuilds a clean surface with marching cubes, then simplifies the result. Julia defined the goals and reviewed every result; Claude Code wrote and ran the tooling.
The wall is 1.2 mm. The cavity reaches up into the hat, so the whole figure glows. Arms, scarf and hat brim stay solid; they glow slightly darker, which gives the figure some contrast.
Step 3: shape the cavity so it prints without supports
The interior is the tricky part. The tool limits the inner ceilings to 45–55° and allows bridges of at most 6 mm at the dome tips. That means the cavity can be printed without any internal supports; the only supports are on the outside.
The opening at the bottom is 40 mm in diameter with a 2 mm high solid standing ring. The inner width is 48–57 mm up to a height of 30 mm and 47.5 mm at 40 mm height. An LED tea light (38 mm diameter, about 40 mm high with flame) fits inside.
Safety note: use LED lights only. PLA softens at roughly 60 °C, so a real candle or a hot bulb is not an option. Use a cool LED tea light or mini LED.
Result: about 29 cm³, about 36 g of PLA, a watertight mesh with about 483,000 triangles.
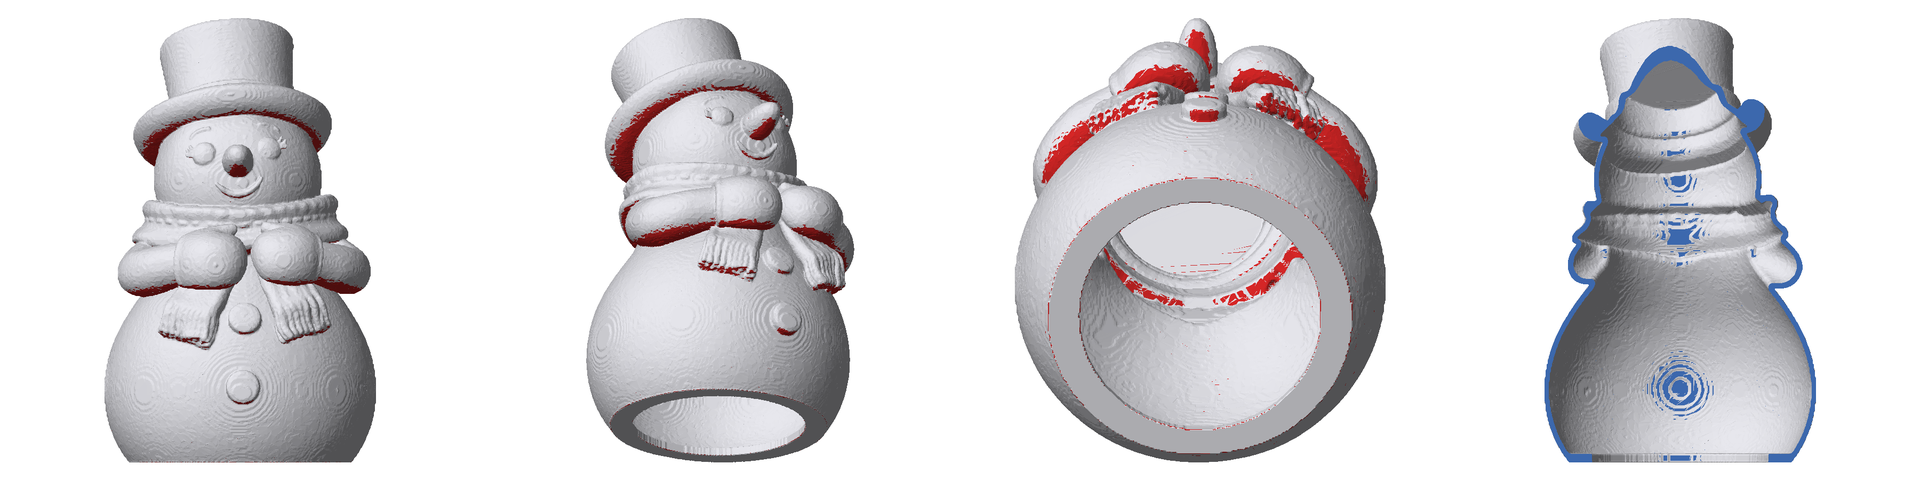
The prepared lamp: front, angled, from below (opening and standing ring) and half section (blue = 1.2 mm wall; red = overhangs over 50° that need supports).
Slicer settings
These are the settings we prepared for a Bambu Lab FDM printer. The lamp is print-ready; it has not been printed yet, so treat the settings as a starting point and expect to tune them.
- Material: white PLA or PETG, 0.4 mm nozzle.
- Layer height: 0.16–0.2 mm.
- Wall loops: 3, so that the 1.2 mm wall is filled completely by wall lines rather than leaving gaps.
- Orientation: upright, with the opening on the bed.
- Supports: tree supports on the outside only – the underside of the hat brim, the arms, the scarf ends and the nose, which are overhangs over 50°.
Print a small test shell first if you change the wall thickness: translucency depends strongly on filament colour, brand and layer height.
The workflow in short
- Write the prompt for the shape: compact, no thin parts, flat bottom.
- Generate a preview with Meshy and choose the best mesh.
- Cut the base flat and scale to the final size.
- Hollow with a uniform wall, limit inner ceilings to roughly 45–55° and keep bridges short.
- Add an opening sized for the LED light, plus a standing ring.
- Check the mesh is watertight, then slice with outside supports only.
Checklist
- Prompt includes "compact", "no thin protruding parts" and "flat bottom".
- Mesh is closed (watertight) before hollowing.
- Wall thickness and wall loops match – here a 1.2 mm wall with 3 wall loops and a 0.4 mm nozzle.
- Inner overhangs stay in a printable range; bridges are short.
- Opening is larger than the LED light, with room for air.
- LED light only, never an open flame.
- Supports are only needed outside the shell.
Our take
Generative 3D models are a fast way to get a shape, but the technical preparation decides whether it becomes a usable object. At JZ Webservices we combine Meshy for generation with Claude Code for custom post-processing tools, while the goals and the final decisions stay with us.
Sources
- Meshy API documentation: Text to 3D
- Meshy API documentation: Pricing
- JZ Webservices own project notes (snowman lamp, October 2026)